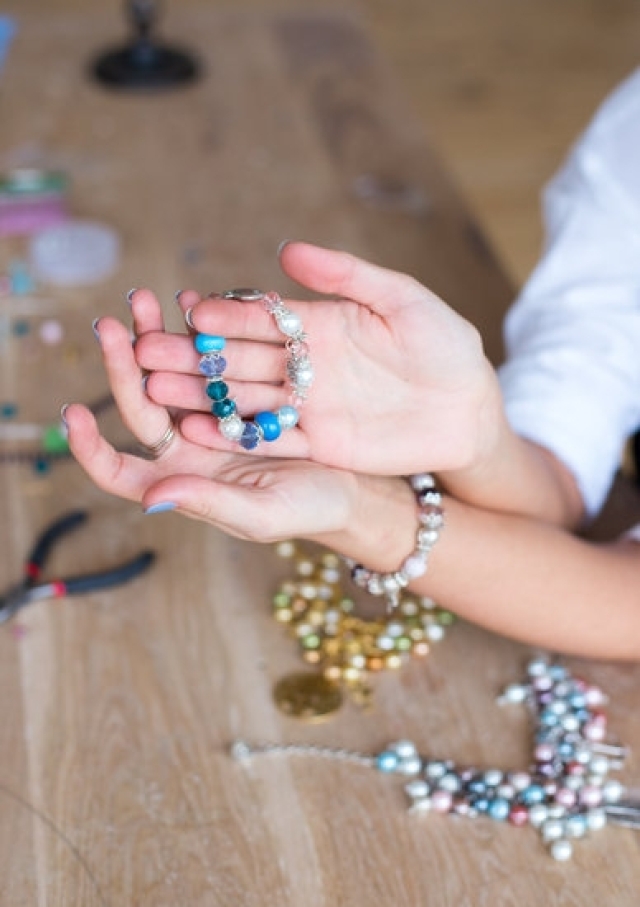
Jewelry repair DIY is a great way to save money and time fixing your jewelry items. For those who lack the experience or patience for traditional repairs, DIY jewelry repairs are a great option. With some basic tools and know-how, you can extend the life of your favorite pieces while saving yourself a significant amount of money when compared to professional repairs.
There’s no shortage of projects homeowners can do themselves with minimal or no experience. Instead of costly shop visits that turn into hundreds of dollars in repair bills after a few hours’ work, many people choose DIY projects as more cost-effective alternatives.
Jewelry repair falls within this category and has one specific advantage over other DIY projects in that it doesn’t require particularly complex tools nor does it take up large amounts of space, making it possible to do them practically anywhere with enough light and limited resources.
Aside from being less expensive than professional repairs, DIY jewelry repair offers an element of customization to your look that otherwise could not be achieved. By making pieces unique to their own design standards, people are able to increase the perceived value of what was otherwise a mass-produced item.
You can add bits and pieces found at home such as stones or beads in a variety of shapes and sizes which make repairing jewelry through a DIY approach quite fluid depending on the extent of how creative you want to get. Additionally, this can be done without compromising the overall structure or integrity since any added elements are typically low weight items affixed with well placed clasps adglues strong enough for most everyday wear applications.
In conclusion, Jewelry Repair DIY is an easy way for people with little skill and resources to save time and money fixing their favorite jewelry pieces while creating one-of-a-kind customizations along the way.
Types of Jewelry Most Suitable for DIY Repair
Jewelry repair can be do-it-yourself (DIY) for small or simple fixes. Before attempting DIY jewelry repairs, it is important to determine what type of jewelry can be safely repaired in this manner. Necklaces and chains, as well as earrings and rings are the most common types of jewelry suitable for DIY repairs.
Components Needed
Doing jewelry repair projects at home requires a few components such as the tools, the item that needs fixing, adhesive materials, beads and wire cutters. Here’s a list of items you need:
- Jeweler pliers
- Needle nose pliers
- Wire cutters
- Bead reamer
- Bead stringing materials such as thread, cable cord and plastic cable tubes
- Clasps or lobster claws for bracelet closures
- Chain nose plier
The use of appropriate tools will help complete these tasks with proper accuracy and finesse when making any kind of jewelry repair do-it-yourself project. If there is ever a question about which tool to use for a specific task then many online resources are available to clarify the best method.
Another key component for effective DIY jewelry repair is quality adhesives like epoxy or clear glue that will help sturdy your work and keep your jewelry in proper functioning shape over time.
Many varieties of glues will come with instructions on how to properly apply them directly on the back of the product bottle – following their direction is ideal when applying to your designs. You may also require certain metals or glass beads should anything become damaged so having access to replaceable parts is fundamental if undertaking any real serious jewellery related tasks.
Moreover you may also want to consider investing in some protective gear like gloves whenever needed – this can be a necessary step depending on what you’re working on and always carries potential risk if safety protocols aren’t considered.
Common Tools & Materials Needed for Jewelry Repair DIY
Engaging in a jewelry repair DIY project can potentially save you money while also learning a new skill. Doing simple repairs on your own and keeping your jewelry looking and functioning its best can make all the difference. Although engaging in these projects will require time, effort, patience, and some specialist supplies as well as tools.
Tools
- Pliers: These come in various sizes and shapes to help complete specific tasks such as gripping or bending a wire.
- Wire Cutters: Capable of cutting thicker wires when applicable.
- Soldering Iron: This widely used tool is used for soldering jump rings, clasps, and earring hoops.
- Polishing Tools & Cloths: Used to clean off dirt or tarnish from metal.
- Tweezers: Can be used to perform fiddly work with much more precision than fingers can achieve.
As well as having the right tools, it is highly advised to have all the necessary materials available including vice grips to securely hold pieces of jewelry during repairs. Depending on the exact material you are dealing with, some more specialized supplies may be required; such as an ultrasonic cleaner for items like gold-plating or antique metal.
Materials
- Jump Rings: In various sizes so they can be attached for fixing a looped chain link together or open up part of a piece like attaching an earring back.
- Clasp & Catchs: There are many different styles available such as lobster claw which are often used for bracelets and necklaces.
- 925 Silver Wire Links & Findings: Used to repair cracked links around chains or other damage areas that replace missing bits.
- 45 Caliber Silver Wire Gauges Crimp Bead Covers & Tubes: Great for adding extra appearance by concealing any knots tied to parts where replacements have been installed with wire like jump rings.
Step-by-Step Guide to Jewelry Repair DIY
Repairing jewelry is an under-appreciated art form, requiring patience, knowledge and a steady hand. A DIY approach can save you time and money – if you’re doing it correctly.
The most important step is to be prepared. Make sure you have the right tools and materials before attempting any repairs. Read up on tips on the type of jewelry you’re working with as best practices vary wildly depending on the material.
Here are some tips for successful DIY jewelry repair:
- Consult a professional before attempting any repairs; they can point out potential risks or unsafe techniques
- Choose the right supplies for your project; make sure you have the correct tools, glue, instruments, etc.
- Organize everything beforehand; this can help prevent any mistakes and ensure that all parts are in their proper place
- Practice on scrap materials first; use these first attempts to perfect your techniques before taking on more delicate pieces
- Follow instructions carefully; read more than once before beginning your repair for maximum accuracy
Common Problems Encountered During Jewelry Repair DIY & Solutions
Jewelry repair provides us an opportunity to restore our beloved trinkets and keep them looking as good as new. It may also prevent a lot of money from being spent on precious jewels that would otherwise probably need replacement. However, many people face problems while attempting to do the job themselves, for example, they often lack the proper tools or techniques to complete it properly.
Below are some common issues encountered during jewelry repair DIY and solutions for them:
- Soldering Issues – Soldering is a key process in jewelry making and repair but depending on the shape of the object it can be challenging for beginners. To solve this problem, always use solder paste when soldering thin objects because it retains its form better than molten solder which can spread in all directions.
- Unsecure Stones – This often happens when a secure setting cannot be achieved with just glue and needs more structurality like that of prongs or claws. A simple solution is brazing with silver solder which will allow you to secure stones properly into place without much hassle.
- Too Much Metal Removal – Beginner jewelers often remove too much metal during shaping or filing processes causing the piece’s integrity to suffer greatly. To avoid this mistake pay attention when filing and work cautiously until you get comfortable working with metals and tools required for metal finishing.
When mending broken or cracked pieces of jewelry extra precaution must be taken since these repairs require more skill and precision than those listed above – such as gemstone replacement and epoxy refilling. If a jeweler encounters difficulties during these kinds of repairs they should seek professional help to avoid any further damage to the piece itself.
Hand engraving on gold is another complicated process that requires special expertise – especially if it’s hard stones like diamonds or sapphires which require specific tools not available at home. In this case, visiting a professional craftsman will ensure your work will turn out perfect without damaging either yourself or the jewelry item.
Things to Consider When Selecting Jewelry for DIY Repair
1. Complexity of the repair: Depending on the kind of repair job you plan to do, some pieces may be too complex for a DIY task. If you’re looking to solder metal pieces or make structural changes, it’s best to leave this type of work to a professional jeweler.
2. The materials used: When selecting jewelry for DIY repairs, look at the particular components being used in the piece. Not all materials are created equal and some require more expertise in order to successfully repair them. Thankfully, silver and gold are relatively easy to work with, whereas resizing a pearl necklace will require greater skill and even specialized tools.
3. Design quality: Consider the craftsmanship behind each piece of jewelry you choose for completion-level details such as clasp security or gemstone settings should not be overlooked when assessing design quality.
Advantages of DIY Jewelry Repair
- Cost savings: You can save money by completing your own repairs instead of seeking professional help.
- Personalized results: With DIY repair, you can achieve results tailored specifically to your taste.
- Experiencing creative freedom: It’s always fun and exciting to bring out your creativity via jewelry making or repairs.
- Feeling accomplished: Whether you repair an heirloom piece from generations ago or create something entirely new, there is a special satisfaction that comes from making it yourself.
Which Techniques are Easiest for Jewelry Repair DIY?
When it comes to jewelry repair DIY, some techniques are much easier for the average person to do than others. Soldering is one of the more difficult processes that requires certain specialized equipment and training, so that process will not be discussed here. Instead, we will focus on three simpler methods: cold connections, restringing beads, and glueing.
Cold Connections
Cold connections refer to joining two metal pieces without the use of a soldering iron or other equipment that requires heat to make a connection. Instead, tools such as pliers and wire cutters are used in this method to create rivets and other patterned connections. This technique is best used when attaching relatively flat metal surfaces such as charms, pendants or links together. Wire-forming can also be done with this method by twisting different types of metals together.
Restringing beads
Restringing beads is another popular technique for jewelry repair DIY. In this method, a string or thread is used to attach beads together into necklaces or bracelets.
This technique does not require any specialized tools or equipment; all you need is some beads (ideally with large enough holes for your thread), thread, scissors and a needle if desired. Make sure you select a sturdy type of thread that won’t break easily when pulled on and double knotting at the end works great for added security.
Glueing
The last technique we will discuss is glueing, which can come in handy for many different types of jewelry repair DIY projects. Glue can be very useful in securing components such as stones in their settings or reattaching clasps and earring backs onto parts of jewelry where needed.
Jewelry-specific glues are available but many craft supplies also have adequate glue sticks that will work just as well – just make sure the glue you buy is strong enough for the job.
Important Safety Guidelines to Follow When Doing Jewelry Repair DIY
Jewelry repair DIY (do-it-yourself) projects can be great fun. However, they should be undertaken with caution as there are a few important safety issues to consider. Here are some guidelines to follow when repairing jewelry:
- Always wear safety glasses and protective gloves while working on your jewelry.
- Be sure that you have an adequate amount of light when attempting any type of jewelry repair.
- Make sure that your workspace is clean and free from any sharp objects or debris
- Never submerge metals in liquids such as chlorine for more than a few seconds at a time.
- When soldering jewelry use flux and solder to help reduce oxidation caused by heat.
- Before attempting to stretch rings make sure that it’s not too thin or brittle, otherwise it may break.
It is always best to start off small with your DIY projects so you can gain experience before moving onto larger tasks. Try simply taking apart pieces and putting them back together first. This will help build up knowledge and skills over time and lessen the chances of damaging any items.
Before beginning any big projects, do some research online to familiarize yourself with the best techniques before starting. With patience, attention to detail, and perseverance it is possible to successfully complete many jewelry repair tasks at home.
When using tools for working with jewelry ensure all edges are rounded off so there is not chance of any slipping whilst in use. Remember that certain tools are specific for certain materials, thus incorrect tools could further damage pieces or cause injury from slips or breaks during use.
Have an assortment of basic tools with sizes suited for the scale of work required ready before beginning a task since stopping mid project due to lack of tools can prove difficult when resurrecting an item later on. A helpful tip would be wrapping handles with electrical tape or similar material which provides grip while remaining secure should handles become slippery due to humidity or sweat during projects.
Cost-Benefit Analysis of Jewelry Repair DIY
DIY jewelry repair is undoubtedly a money-saving endeavor, as it eliminates the cost of professional services. However, there are more factors to consider in terms of cost than just the savings in professional labor. If you value your time highly or lack the experience, patience and skill required for successful repairs, DIY may not be the ideal course of action.
To start, not every jewelry repair requires DIY; some basic jewelry repairs can be done at home with minimal effort. For example, replacing a stone or a clasp is generally easy enough on simpler pieces that have few details or components requiring precision assembly.
Even applying a coat of polish to tarnished metals can easily be done with regular household items like toothpaste and baking soda. On the other hand, complex repairs such as resoldering broken mountings or resizing a ring are best left to professionals who have access to specialized tools and knowledge about safety issues associated with these types of projects.
For anyone willing to invest the patience and time required for complex repairs, DIY can save plenty of money over taking your item to a jeweler. To get started, make sure you have plenty of resources available: properly sized tools (hammer, pliers etc. ), files in various shapes and grits and any chemicals needed for gem setting and soldering.
Knowledgeable guidance can also be an invaluable resource: many online tutorials or local classes offer step-by-step instruction on handling jewelry repairs. The more prepared you are before starting, the less likely you are to run into problems further down the line due to inexperience or improper techniques/equipment usage.
Additionally, materials costs should always be factored into any consideration of DIY repairs – not only because quality replacement parts will usually cost less when bought individually instead of from a jeweler but also because badgering these parts may require replacing them multiple times due to beginner’s mistakes.
It’s also important to remember that regardless of how simple it may seem from an instructional video, jewelry and watchmaking is still delicate work; even experienced hands face obstacles when attempting advanced repairs without sufficient resources available (and sometimes even then).
Finally – though this should go without saying – any attempt at jewelry repair should take place under adult supervision if children are involved in the project.

Welcome to my jewelry blog! My name is Sarah and I am the owner of this blog.
I love making jewelry and sharing my creations with others.
So whether you’re someone who loves wearing jewelry yourself or simply enjoys learning about it, be sure to check out my blog for insightful posts on everything related to this exciting topic!


